Before we move you from Window 7 to Windows 10 you will need to do some preparation.
When you move across to Windows 10 (or upgrade from an earlier version of Windows 10), the way Microsoft’s operating system installs means you will lose access to everything currently on your hard drive – (partitioned into your D: Drive and C: Drive, including your desktop). Make sure you’ve tidied up your files and saved everything you need where you will be able to find it after you have the new Desktop.
It can take a short while from confirming that your workstation is ready for upgrading to Windows 10 until DTS will have the resources to complete this task. In the meantime please do not save files to D: or your desktop without also ensuring they have have also been saved to OneDrive otherwise they will be lost when the workstation is re-imaged.
To make sure your PC is ready for the new desktop (and retain your files and templates) please check you have completed the following.
- Ensured all your required software is available within Windows 10
- Copying your files from D:
- Copying files and shortcuts from your Desktop
- Transfer your Chrome settings
- Run the Desktop Assistant
Check that all the software you require is available for Windows 10
Before being moved to Windows 10 it is essential to ensure that the corporate applications work that and all the software you use is available within Windows 10.
Any application packaged for AppsAnywhere should work with Windows 10 and a lot of other software is available, but at present not all software is available and some that is has been updated the to latest version in order to be compatible with Windows 10.
You should not move to Windows 10 if you are not sure everything you require for you job is available.
Copying files from D:
With previous Managed Desktops you would probably have had a D: drive on the workstation where you could save personal files and files that were not important to the University. This was due to us having limited personal network storage. With the introduction of Office 365 all users receive 1Tb of personal storage that is easily accessible from the Windows 10 Managed Desktop and web browsers.
Having a D: drive causes DTS issues with re-imaging workstations and would frequently be unused space whilst having little remaining space on C:. Removing the D: drive from workstations will improve the usability and support for Managed Desktops.
Before your workstation can be re-imaged to Windows 10 you should ensure you have copied all of the files you wish to keep to another location, the easiest and most appropriate location for most files will be OneDrive for Business.
A workstation with a C: and a D: Drive present

SHU guidelines for file locations
This table shows where you should save files in order to comply with SHU guidelines.
Please note that University data should be kept on network storage that is backed and secure such as the N: drive. It should not be kept on personal cloud storage such as a personal Dropbox account and we do not support these sync clients.
We would recommend that your personal files are copied to OneDrive whilst University data is copied to the appropriate University network storage.
SHU Cloud Storage Policy and Encryption Policy
When using OneDrive, or any Cloud Storage you must be aware of the SHU Cloud Storage Policy.
If transferring SHU files from OneDrive to personal devices including non-SHU computers the device must conform to the SHU Encryption Policy.
Copying files from D: drive to OneDrive for Business
This can be done either using the OneDrive sync client, the OneDrive Mapping Tool or via the Chrome web browser.
The OneDrive sync client is the easiest and most reliable method for transferring files and is the method we would recommend.
The other two methods have their limitations but between them they should be sufficient for copying your files if you wish to use one of these methods.
Using the Onedrive sync client to move files from D: to OneDrive for Business
View the information here regarding using the OneDrive sync client to move files from D: drive to OneDrive for Business.
Using Chrome to move files from D: drive to OneDrive for Business
View the information here regarding Using Chrome to move files from D: drive to OneDrive for Business.
Using the OneDrive Mapper tool
View the information here regarding using the OneDrive Mapper tool to copy files from D: to OneDrive.
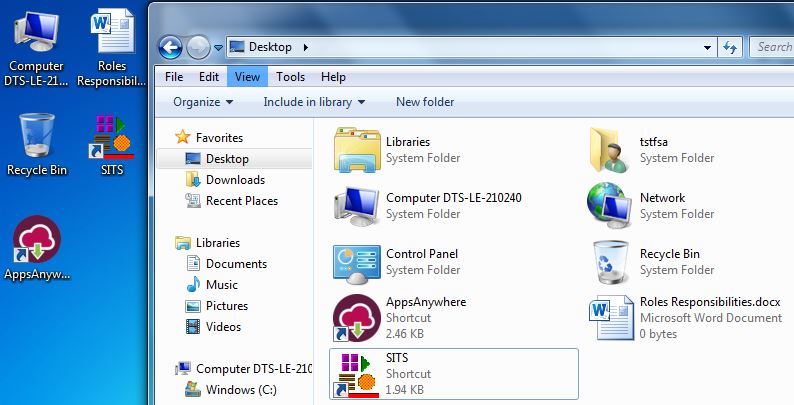
Copying files and shortcuts from your Desktop
You might have files and shortcuts on your desktop that you wish to retain after the move to Windows 10.
This can be done using the same process as for moving data from your D: drive, but from your personal desktop folder. Your personal desktop folder is available from within Windows Explorer.
To do this, open Windows Explorer and select the Desktop folder underneath Favorites and then select the files and shortcuts you wish to copy from the Desktop.
Transfer your Google Chrome settings from MD7 to MD10
It is possible to transfer your current Google Chrome settings from MD7 to MD10 using these instructions:
Transferring your Google Chrome settings
Use the Desktop Assistant tool
When you are informed that you are due to be upgraded to Windows 10 you will be asked to run the Desktop Assistant tool that will take you through a few steps to help move from Windows 7 to Windows 10.
This tool will perform a few checks to ensure your workstation is compatible with Windows 10 and perform some housekeeping such as allowing you to save your email signatures and Office Template files so that these can be transferred to your Windows 10 workstation once setup.
After you have confirmed that all the actions have been completed and your workstation is supported an email will be sent to the DTS Helpdesk System creating a job ticket to have Windows 10 installed on your workstation.